The Facebook Conversion API (CAPI) is a useful tool offered by Meta that can enhance the targeting and reporting capabilities of your Facebook ads. However, many marketers tend to overlook it due to the complexity involved in setting it up. In this article, we’ll explore how to set up the Facebook Conversion API through Segment easily.
As online advertisers, we rely on Meta Pixel to track events when a user visits our website and performs actions such as pageview, button click, form submit, and Add to cart. The Pixel collects and sends these events directly from the user’s browser to the advertising platform. This helps us optimize our ads and improve ad performance.
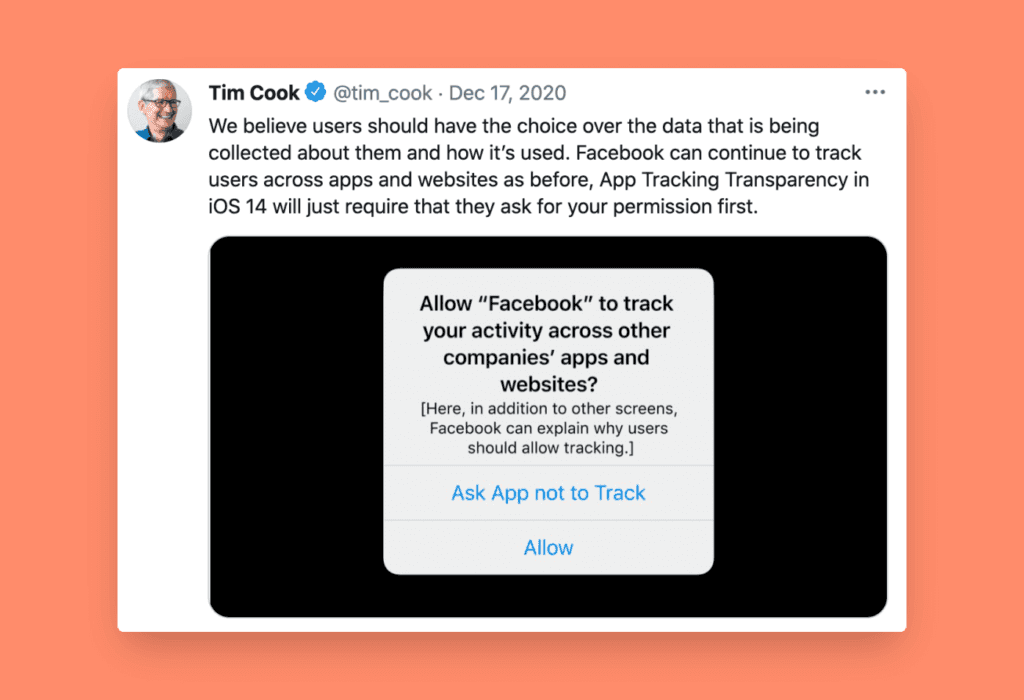
As people have become more cautious about their privacy, they are reluctant to be tracked. As a marketer, you may have experienced a negative impact on Facebook Ads due to the iOS 14 update in September 2020.
In the iOS 14 Update, Apple allowed users to opt out of being tracked by Facebook, which affected ad targeting. As a result, Facebook advertising was severely impacted at that time.
However, Facebook later made several algorithm updates to their platform and introduced several changes to safeguard marketers. One of the awesome updates was Conversion API, also known as CAPI.
What is Meta Conversion API (CAPI)?
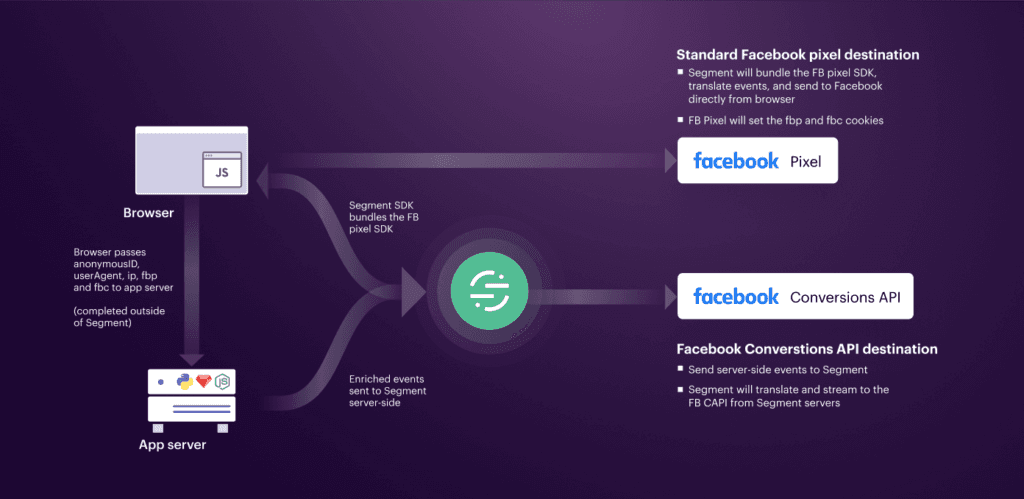
Facebook’s Conversions API is a way to send your data directly from your application servers to Facebook. This is more reliable than using Facebook’s pixel to collect data from the user’s device. With Conversions API, you can choose what data to share with Facebook and share conversion events that may not even happen on your website. This includes events that happen within your app or CRM.
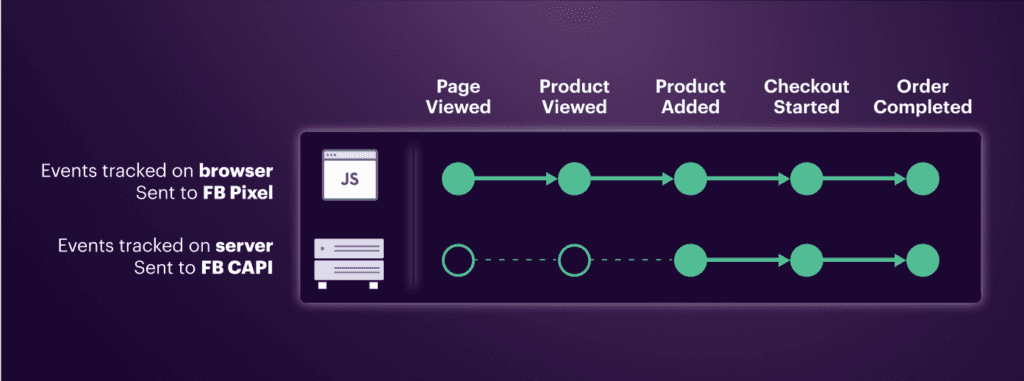
Image credits: Segment.io
Benefits of Using the Facebook Conversion API
Better Ad Targeting: By pulling all your data into one place, the API provides richer insights, enabling more accurate ad targeting and improved audience reach.
More Cost-Effective Campaigns: Sharper targeting and precise measurement allow you to refine your advertising strategies, reduce costs, and increase your ROAS.
Campaign Attribution: Forget about guessing how your campaigns are performing. The Conversion API offers reliable data, giving you a clear picture of your campaign’s effectiveness and ensuring conversions are attributed correctly.
Easier Data Integration: The API takes the stress out of managing multiple data sources by consolidating them into a single system, streamlining your operations and boosting efficiency.
Tracking Offline Conversions: It’s also equipped to track offline events, making sure that every conversion, whether it happens online or offline, is measured and accounted for in your analytics.
There are multiple ways to set up Facebook Conversion API, but in most cases, you may need the assistance of a developer to do so. However, platforms such as Segment.io make it super easy to set up the Facebook conversion API.
How to Setup Facebook Conversion API with Segment.io?
Step 1: Create Meta Pixel
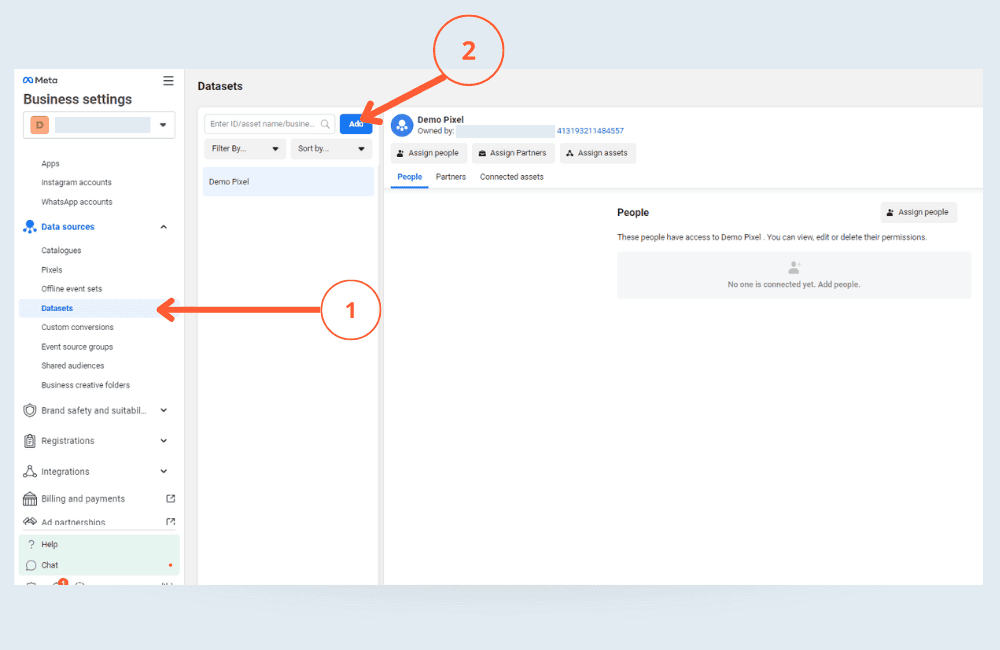
First, You will need to create a Meta Pixel, to create new Pixel go to your Meta Business Settings and click on Data Source > Datasets. Then, click the add button to create a Pixel.
If you already have a Pixel, then you can ignore this step.
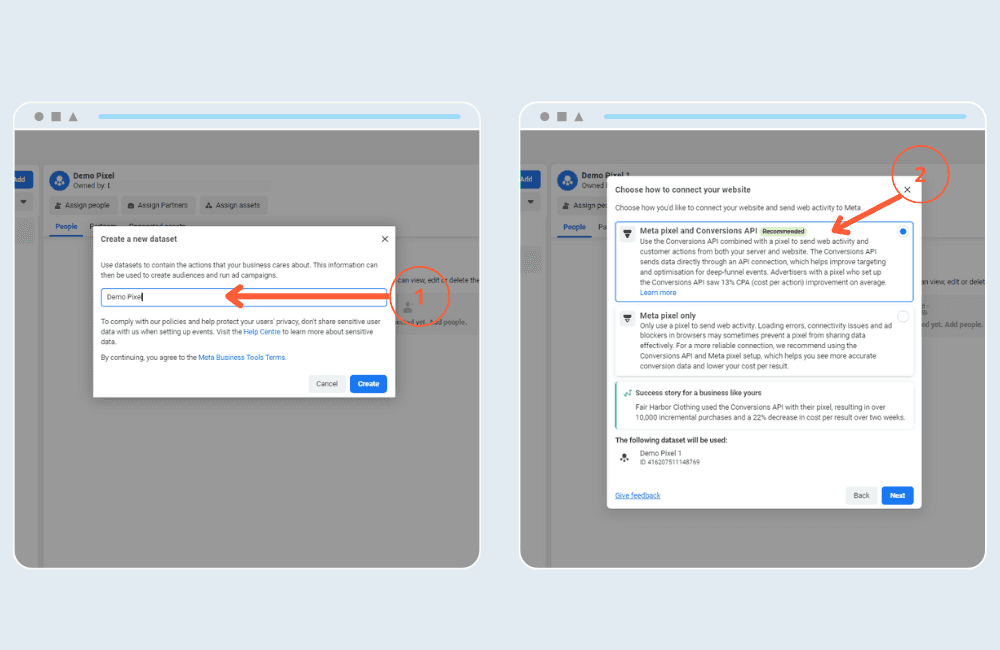
Now, name your pixel, (here I have given it as Demo Pixel) and click Create.
Then, you will have the option to “choose how to connect your website“, Here you can select Meta pixel and conversion API and click next.
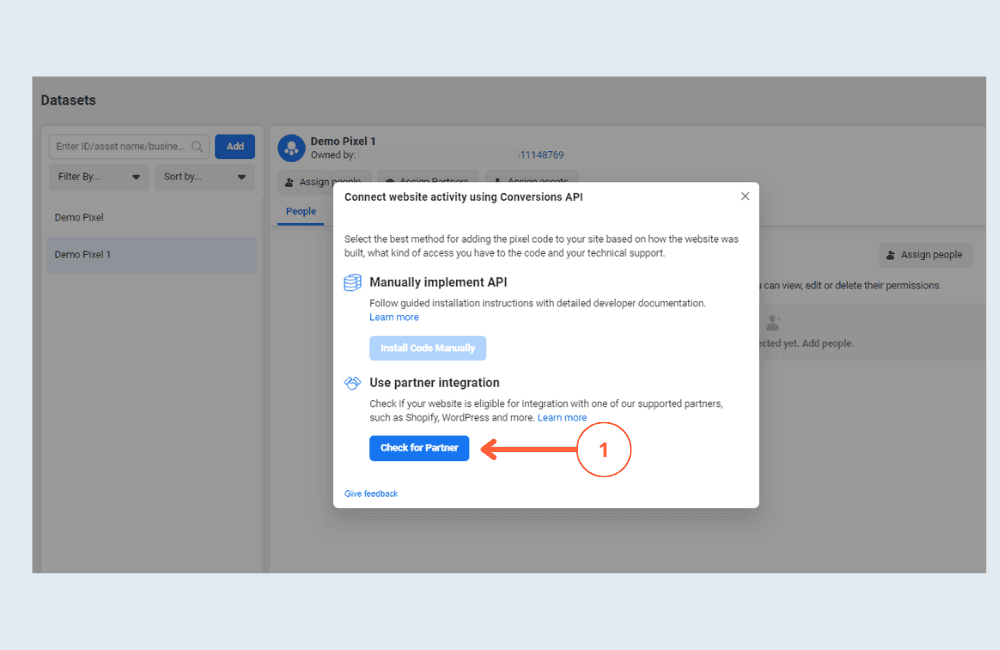
Connect website activity using conversion API.
In this step select check for partner Integration
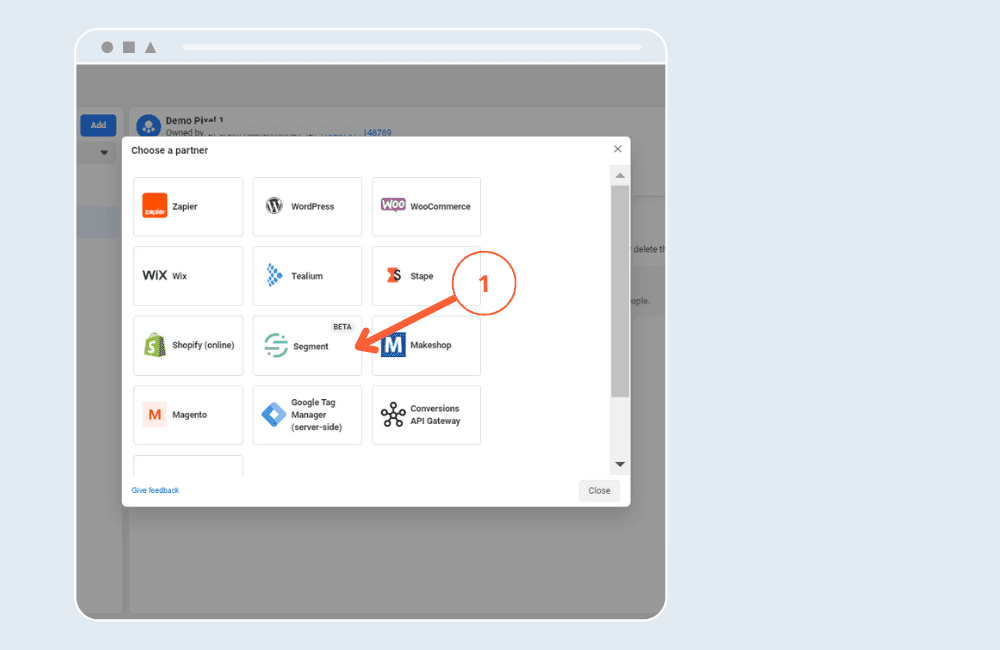
Select Segment
Connect your segment account to Meta
First, Turn on Authorise Segment Connection and click on Next Button and then click Finish.
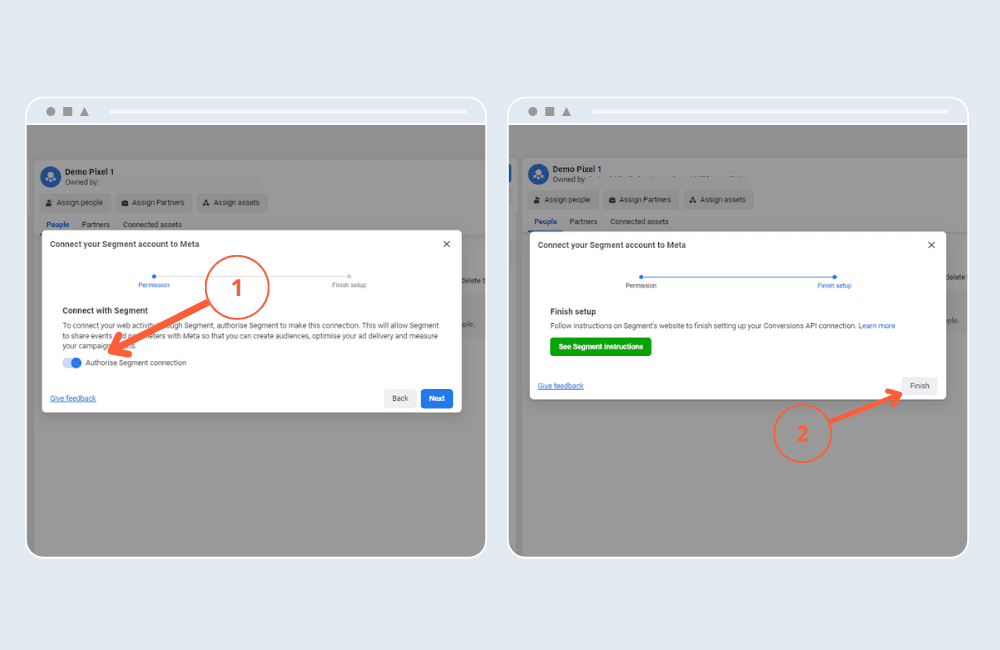
Done, Your Meta Pixel is created.
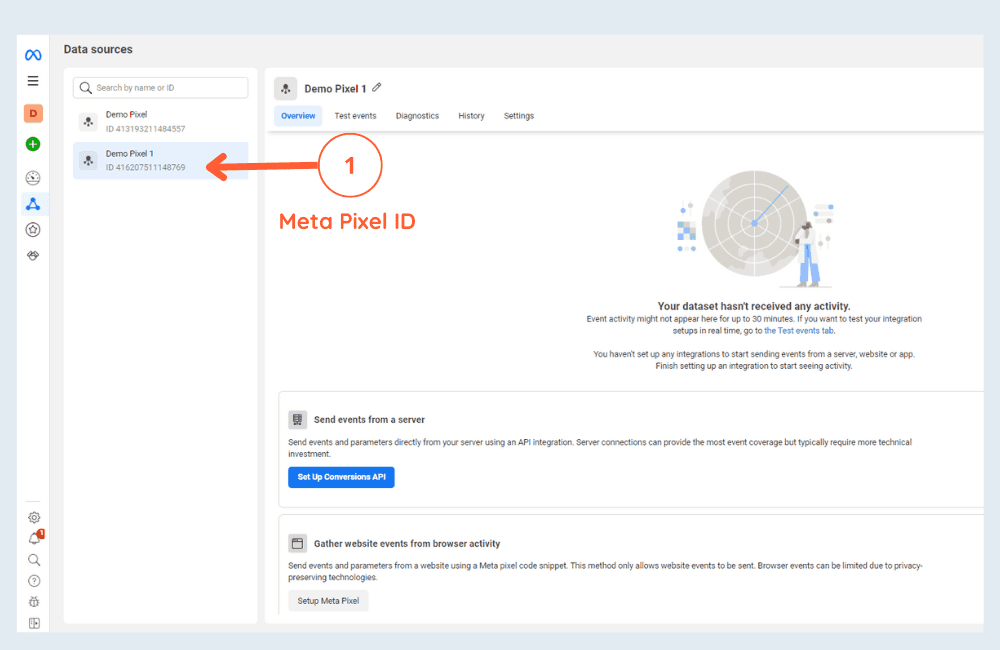
Step 2: Setup Segment.io
To set up Facebook Conversion API using Segment, you need to make sure of the following things:
Your website is integrated with Segment.io
You have set up tracking events for form submissions, Add to Cart, Purchase, etc.
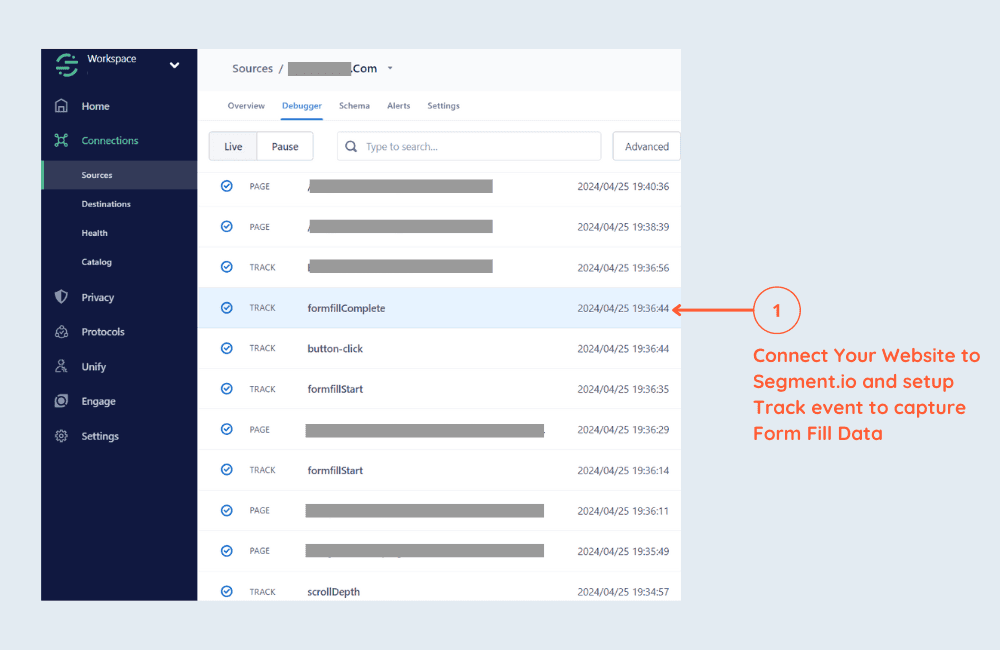
Go to Sources > Website > Debugger > and check for the track events
As you can see in the attached screenshots, whenever a user fills out a form on our website, we have set up a form submit tracker via Segment to capture the data.
You can learn more about tracking events with Segment in – this post. If you need help setting it up, consult with your developer.
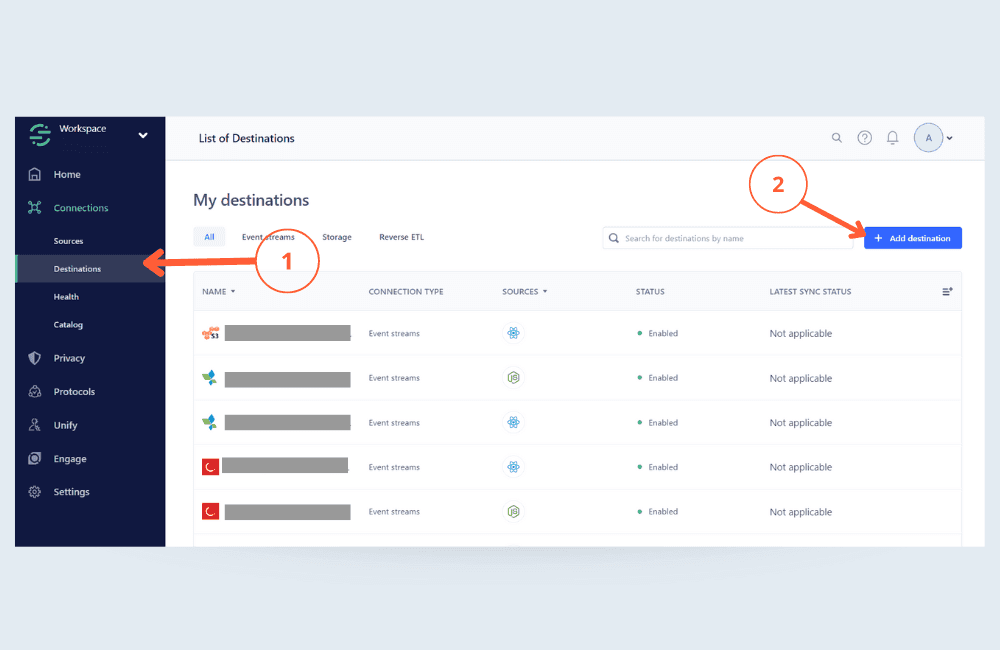
Once you have integrated, your website. Go to Connections > Destinations and Click + Add Destination.
Step 3: Add Destination – Facebook Conversion API (Action)
Go to Catalog and search for Facebook Conversion API, and select the destination ‘Facebook Conversion API (Action)“
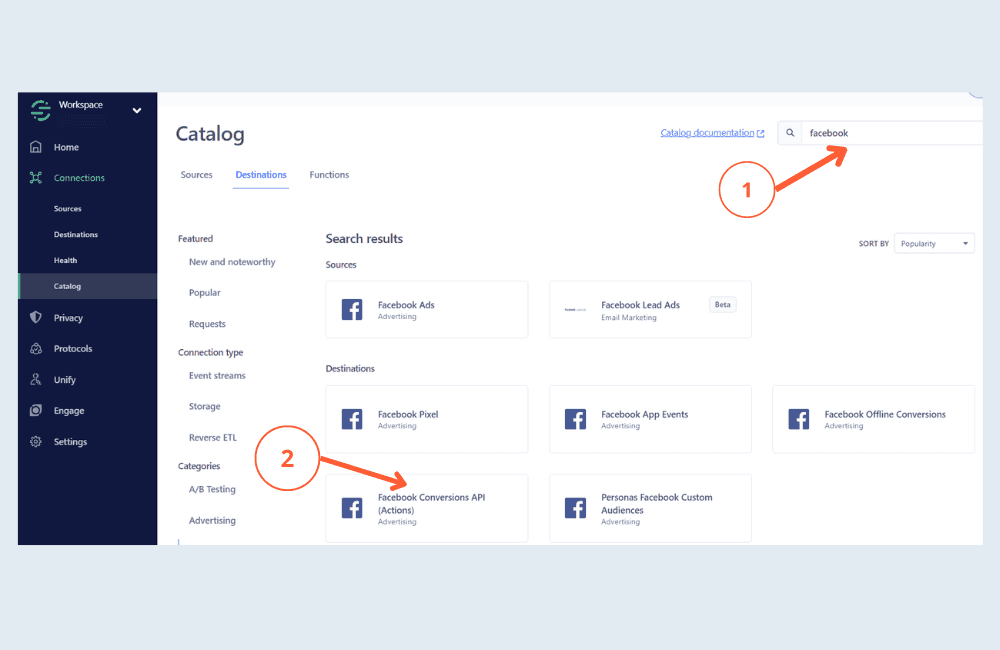
Select Data Source:
Now you need to select a data source for this destination. Since website is the source, select your website data source and click next.
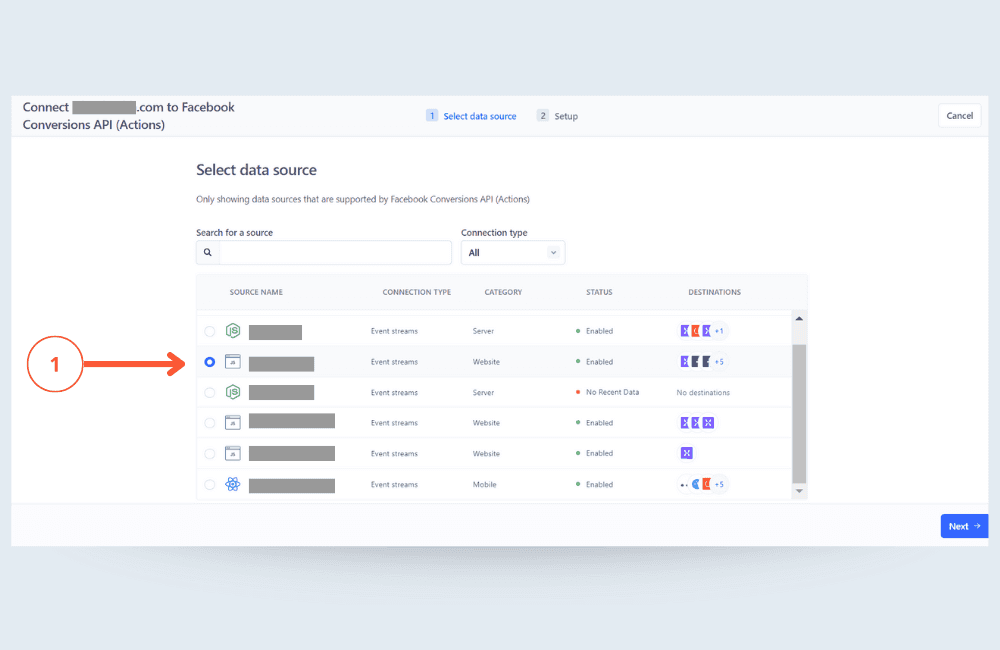
Setup:
Destination Name: Give it a name like – Facebook CAPI
How would you like to set up this destination? – Select fill in setting manually
Click Create Destination.
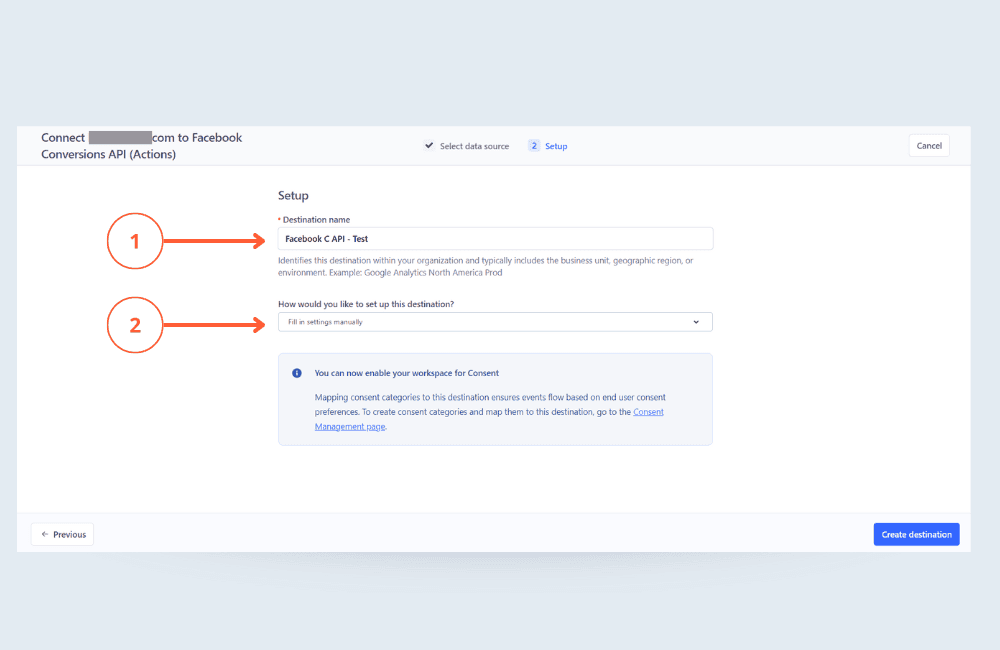
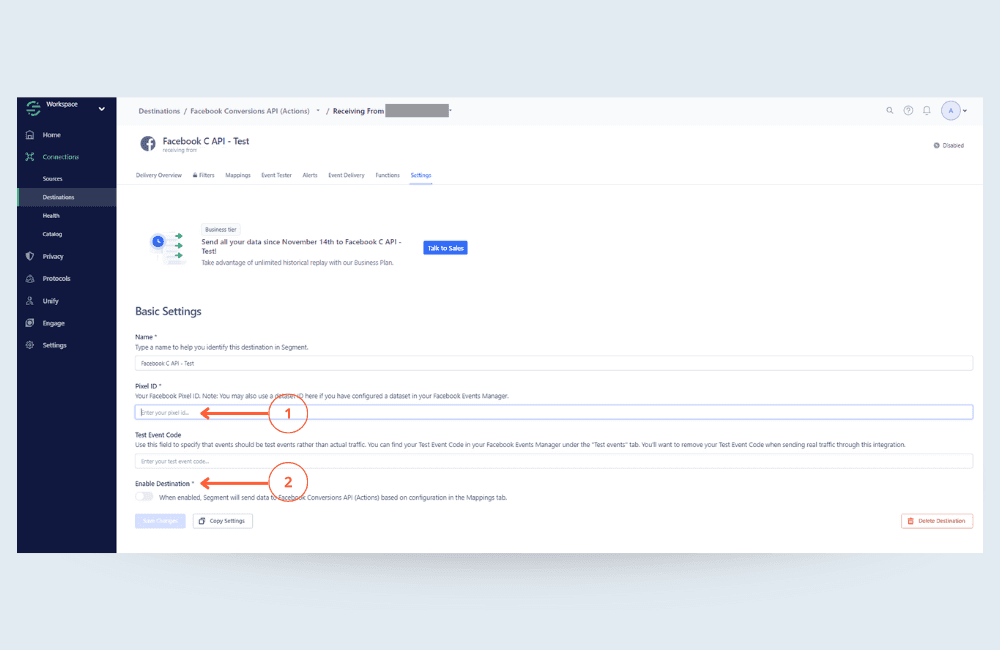
Setting of Facebook Conversion API Destination:
Name: Give it a name
Pixel ID: Enter your Meta pixel ID. If you don’t know where it is, refer to STEP 1.
Test Event Code: Leave it blank.
Enable Destination: You can turn it On.
Saves The Changes.
Step 4: Configure the mappings of the destination
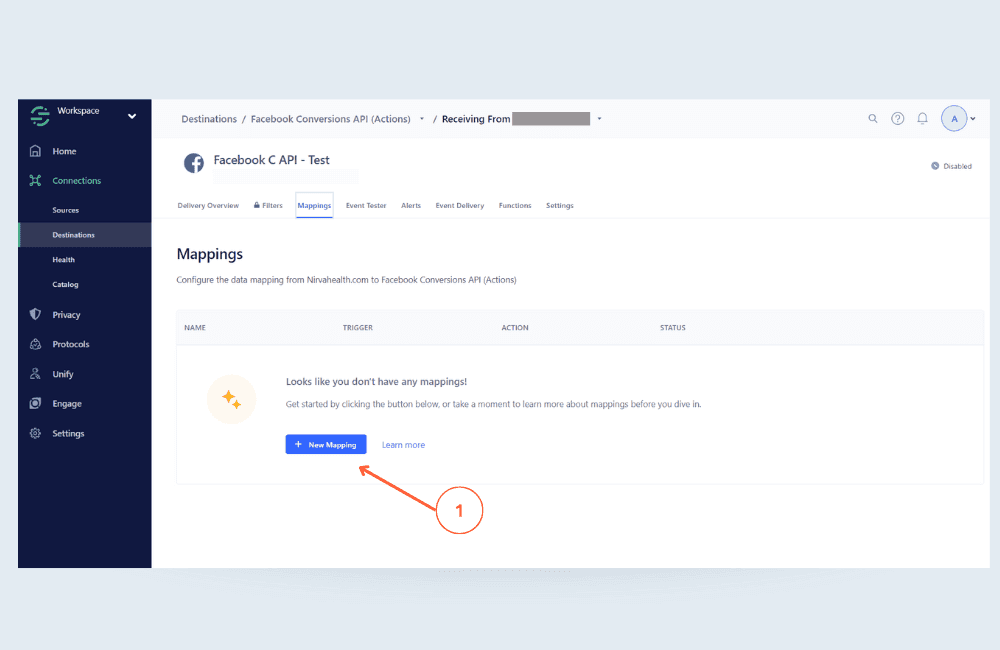
Now we have to setup the mapping, to send the data from segment to our pixel. To do this you need to Vist Mappings > New Mapping.
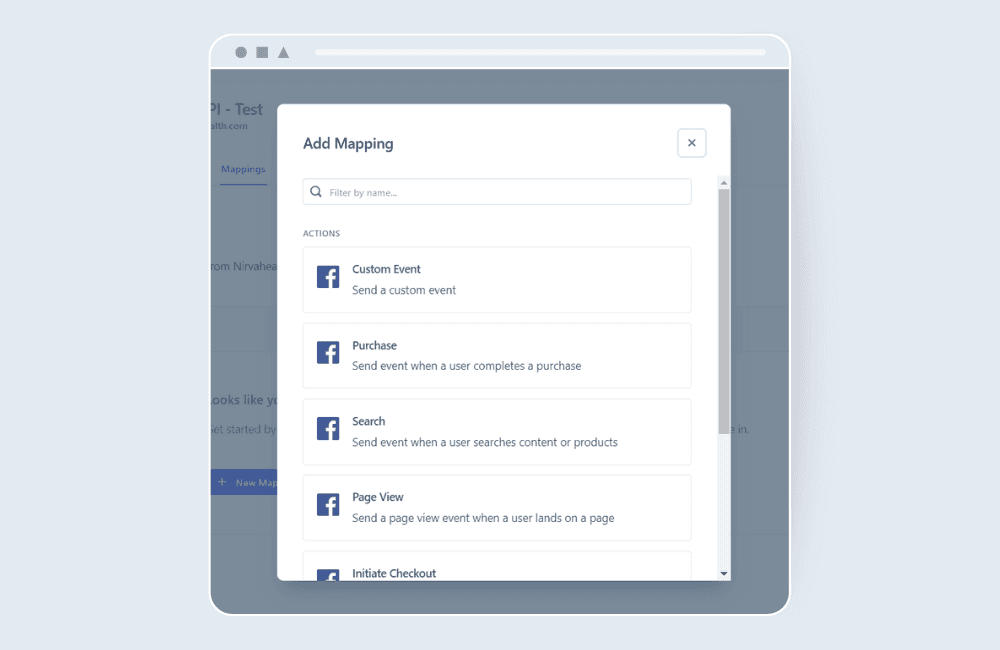
Add Mapping
Segment has already created some custom facebook Pixel mappings like Purchase, Search, Page view, and Initiate checkout.
In this tutorial, I will setup Conversion API to send user details to Facebook whenever a visitor submit a form in my website. By sending more user data back to Meta, we can help their algorithm better understand our target audience, which will lead to more effective ad targeting.
So we will select Custom Event.
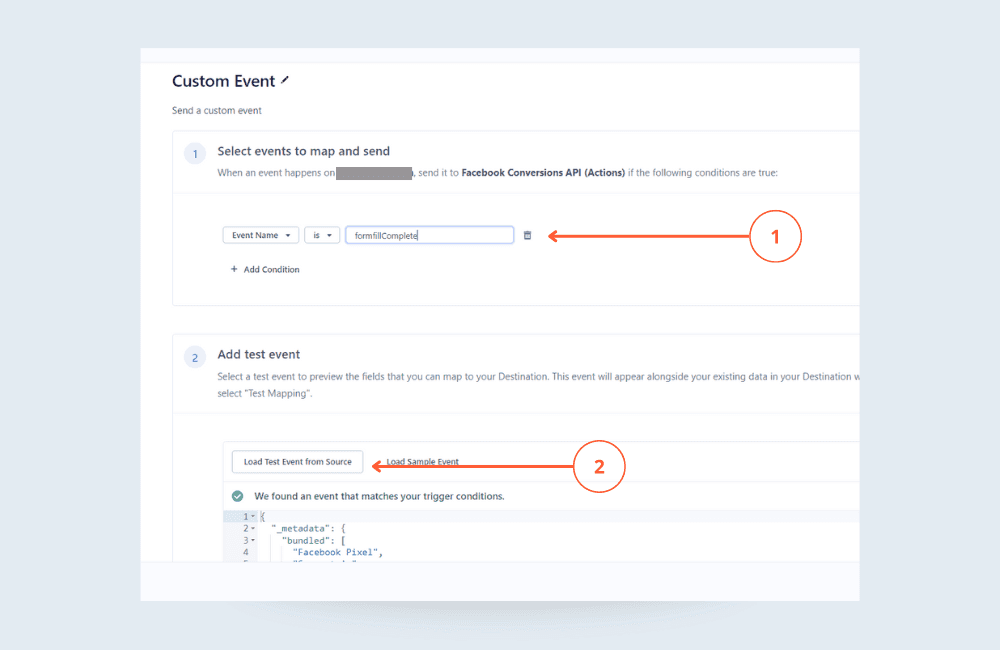
Custom Event Setup
1. Select events to map and send: Enter the event name, which you have setup to track form submit data from website, If you don’t know that event name, go to the website source in segment and check the debugger.
Here, I have put “formfillcomplete” event because that is the track event which we have setup to capture form submit data in segment.
2. Add test event: After entering the event name click on load test event from source.
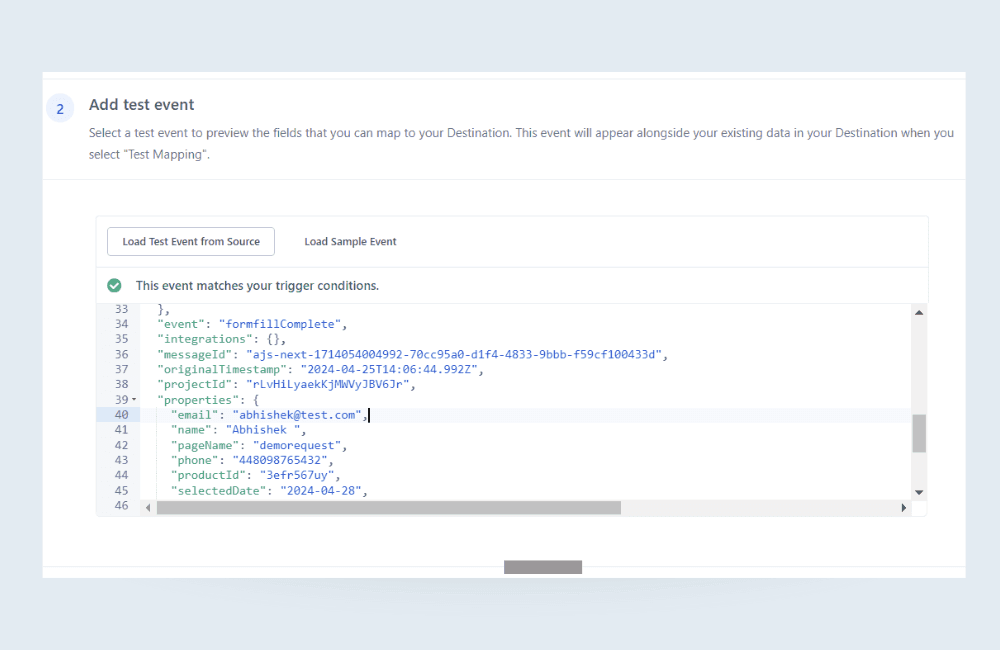
After clicking on the load test event, a sample trigger event will appear. This event is triggered when a user submits a form on the website and includes parameters such as name, email, phone number, country, city, and region.
It is up to you what parameters you are capturing through your website.
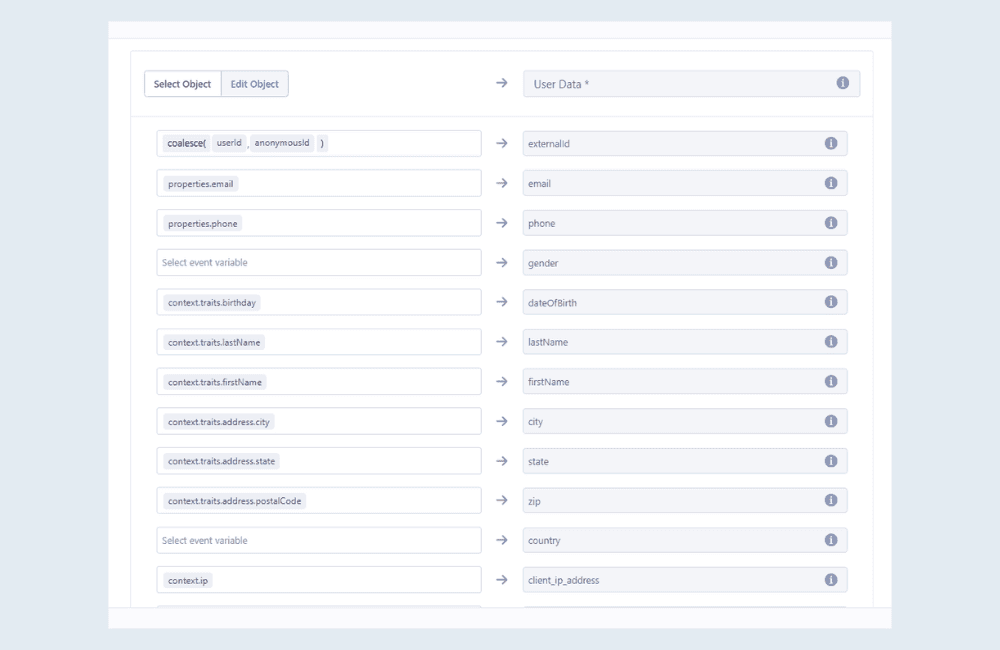
Now, once you have a sample data, you just need to map it.
Map all the available properties like Name, email, Phone, Country, City, Region, Gender Etc.
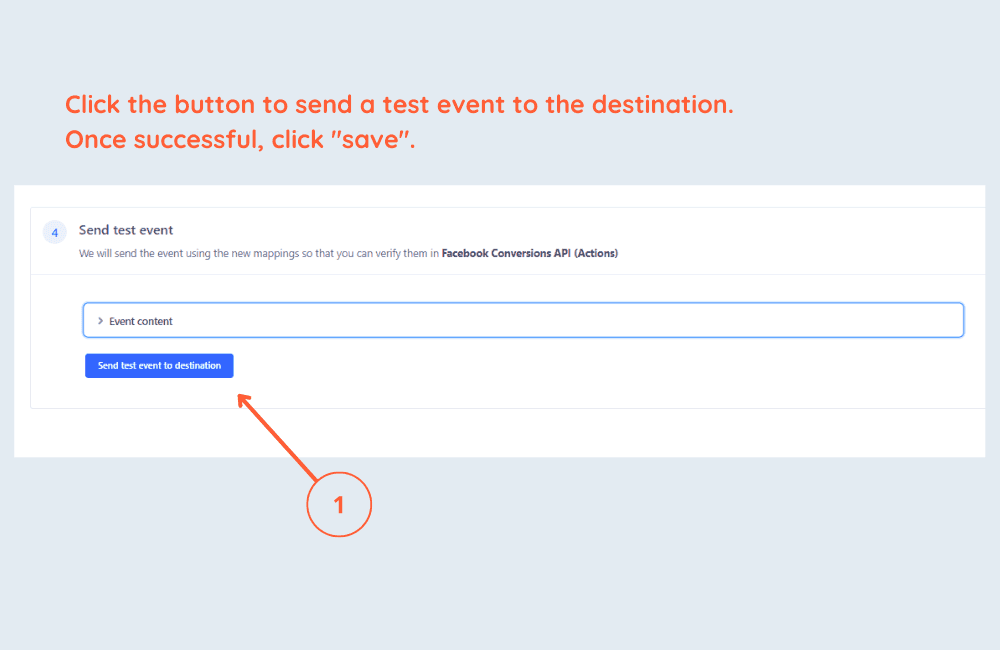
After you have mapped all the properties, click on the “Send test event to destination” button. This will send a test event to the Meta. If the test is successful, you can click on the “Save” button. If the test fails, check the error message and fix the issue accordingly.
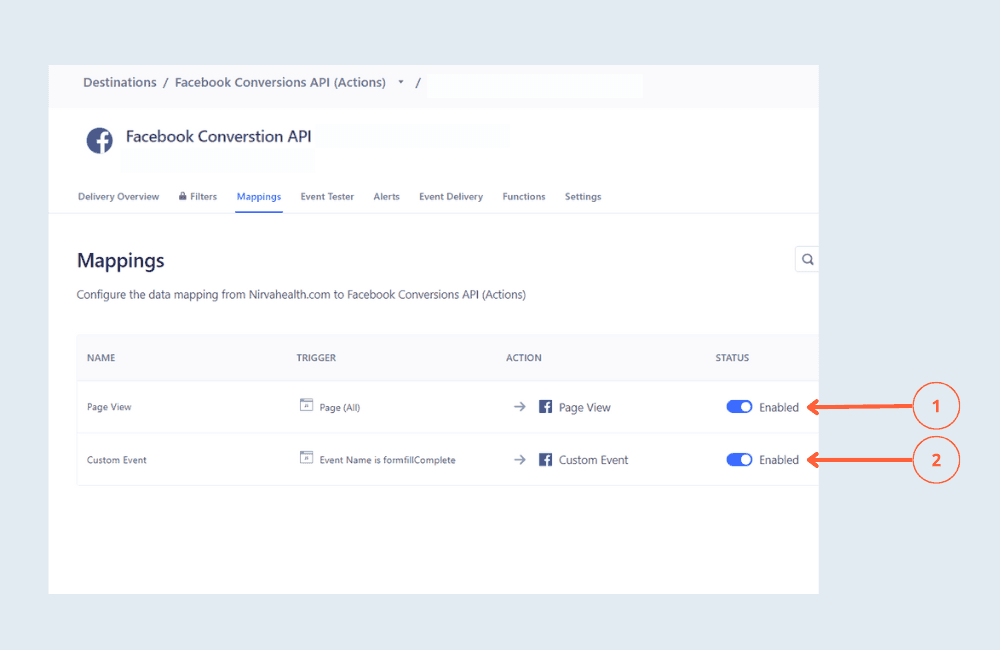
Once you have set up the custom event, you also need to set up the “Page View” event and enable the mappings. Follow the same steps above to set the Page View event; just change the custom event to the “Page View” track event and map the parameters.
Step 5: Check Meta Events Manager
Now, go to the events manager within the meta ads manager to see if the events are coming or not. If you don’t see the event right away, don’t worry – it may take some time to appear.
Simply visit your website and manually perform the action that triggers the event. This should help the event to appear in the events manager.
Once you see your custom event in the event manage, click on it, and click “View Details.”
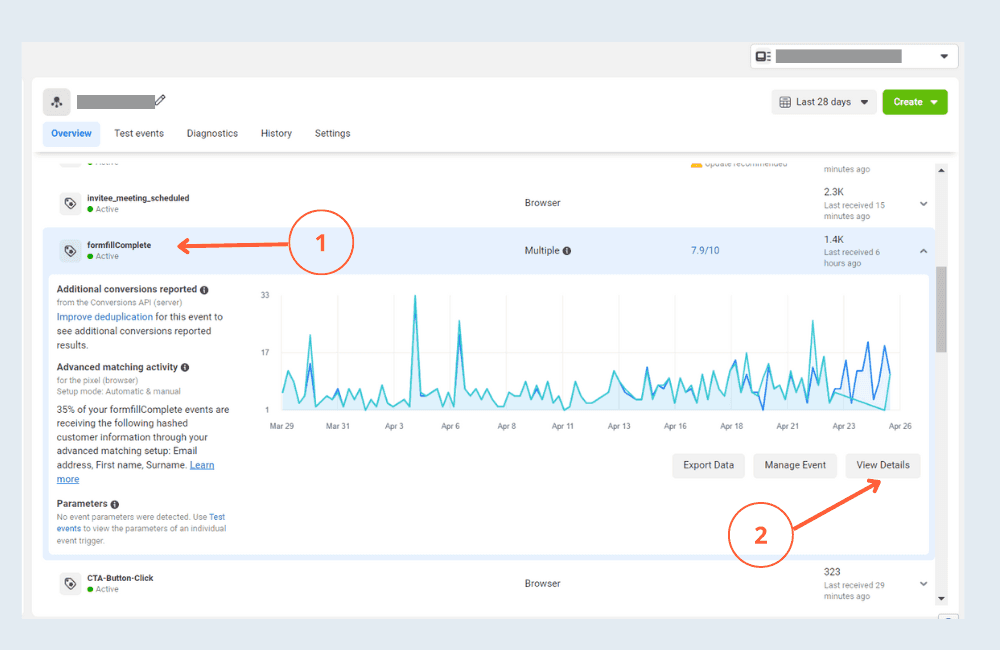
Here, as you can see, the events are being received from the browser as well as the Server. This means both pixel and server are sending the event data to Meta and your conversion API is working properly.
Congratulations, you have successfully configured Meta Conversion API via Segment.
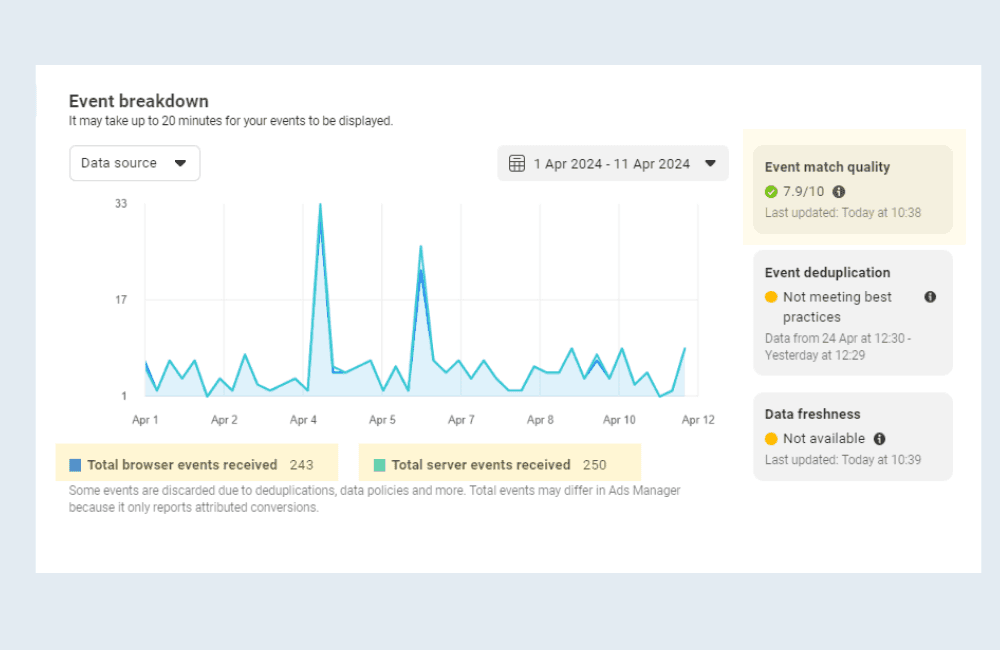
Events Overview in Meta Event Manager
In the events overview tab, you will be able to see the analytics and the performance of your event. Meta will tell you the Match Quality Score and Event Deduplication stats.
The Match Quality Score is given by Meta when you configure the Conversion API. You don’t have to score a perfect 10/10. Simply sending the basic parameters is enough to improve your score.
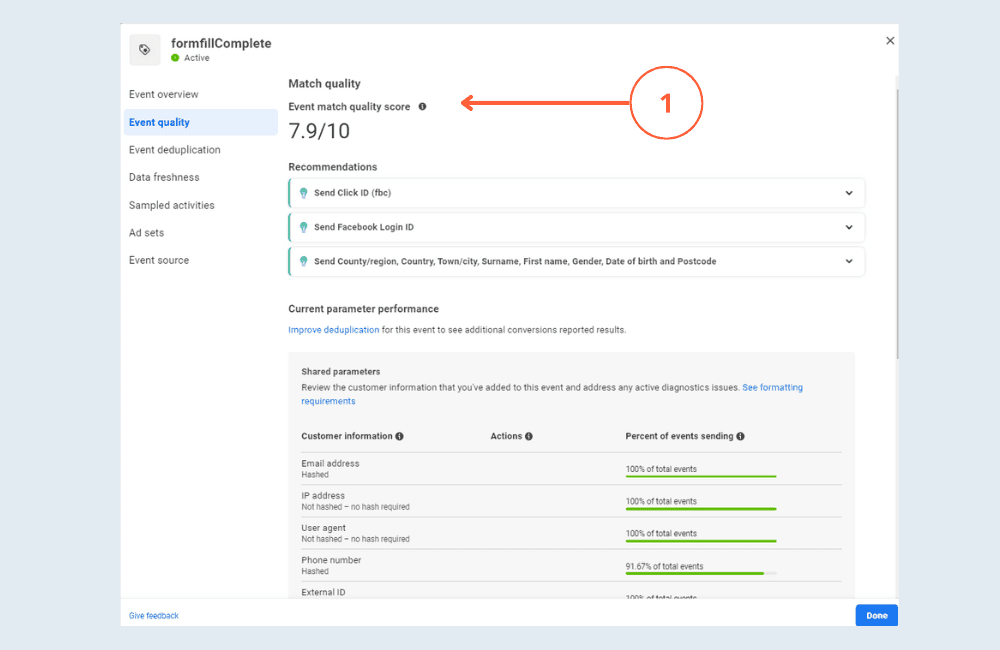
How to improve the Match Quality Score in Meta Events Manager?
While setting up Facebook conversion API, sending more parameters can lead to an improvement in your quality score, but it is not mandatory to provide all the details. Basic information such as name, email, country and city, which are usually captured on the website, are sufficient to improve your match quality score.
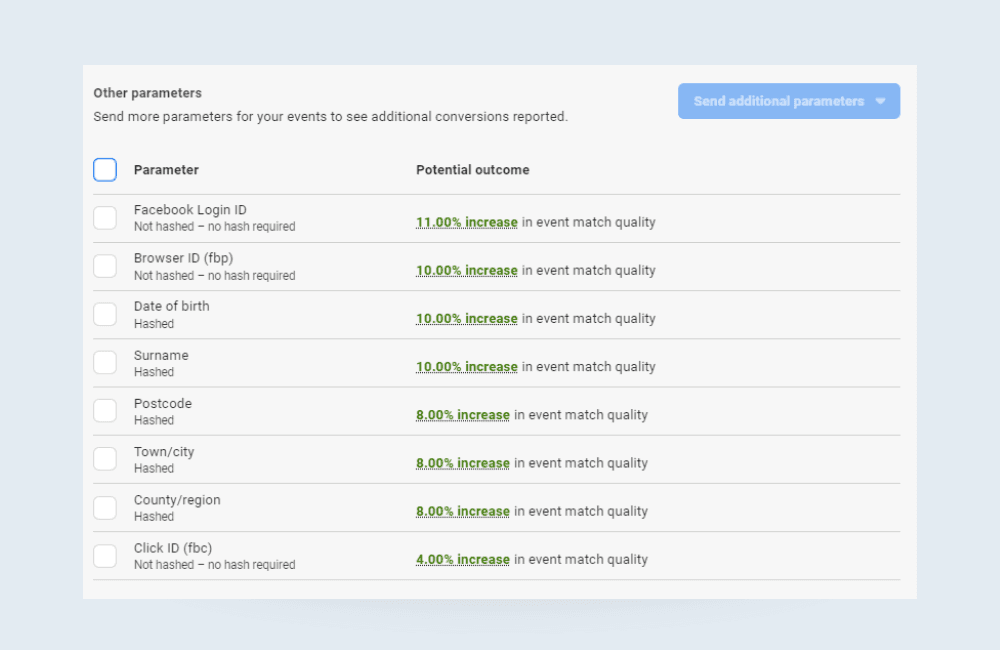
Conclusion
The Facebook Conversion API is a tool that enables you to track events on your website or application more efficiently, securely, and with better reporting.
This API also helps the Facebook ads algorithm optimise audience targeting, which can ultimately help serve more relevant ads to people interested in your products or services. By targeting the right audience, you can increase the chances of users taking action such as filling out a form or making a purchase.
If you’re a marketer, you can make use of Segment.io to easily set up the Facebook Conversion API without having to rely on developers.
I hope this article helped you. If you face any issues, please let me know in the comments, and I will get back to you ASAP.

